Editing features
Overview
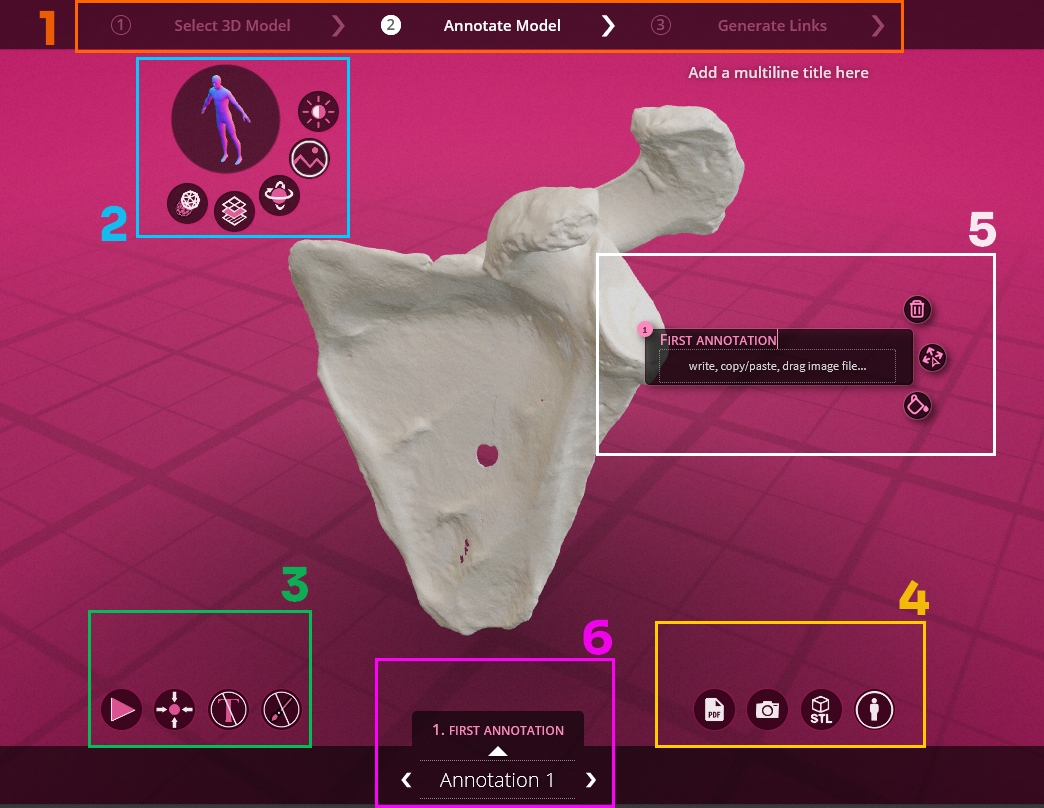
1. Main Navigation
The upper part of the editor allows you to navigate between the 3 screens of the application.
See all 3 screens
2. Avatar menu
The 3D avatar allows students to locate themselves in space. It is possible to align the model in relation to it, thus offering the possibility to the public to easily understand where the front, the back etc. is located. of your model.
Around this avatar different buttons offer functionalities. These are only available in the editor (not in the public viewer)
See all features
![]()
This function allows you to see the collision mask generated for your model. This mask is a lightweight version of your original model used for annotation positioning calculations.
This mask is only generated once when the model is first opened. It is then saved in the model data.
If the latter seems incorrect to you, contact the support of your institution.
![]()
This function opens a menu at the bottom of the screen allowing you to change the texture of your model.
This feature blocks access to other features, you must click the button again to close the menu before accessing other features.
![]()
This function opens a menu consisting of 4 arrows. The latter allows you to position the model so that the front of it matches the front of the avatar.
This feature blocks access to other features, you must click the button again to close the menu before accessing other features.
![]()
This function opens a menu allowing you to choose the background color. It is possible to choose a transparent background, in this case only the template will appear above the original background of your website
This feature blocks access to other features, you must click the button again to close the menu before accessing other features.
![]() This function intensifies the lighting if your model seems too dark.
This function intensifies the lighting if your model seems too dark.
3. Public Menu
This menu offers 4 functions available both in the editor and in the public viewer:
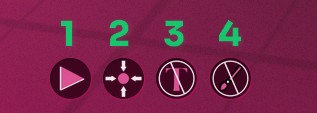
- Start, stop, change animation
- Recenter the model in the center of the viewer
- Show annotations and their number, show only numbers, hide all annotations and numbers
- Draw on the model see Section "Draw"
4. Export Menu
This menu offers 4 functions available both in the editor and in the public viewer. The latter make it possible to generate information from the model.
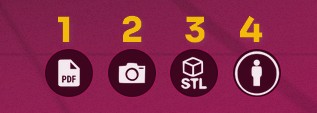
- Export your model to pdf, with all associated views and annotations
- Generate a screenshot of the current view
- Export the model in .stL format for 3D printing
- View license information and model attribution.
5. Annotation
It is possible to generate an annotation by clicking on the model. This annotation is accompanied by a configuration menu. Further details see Section "Annotate"
6. Annotation menu
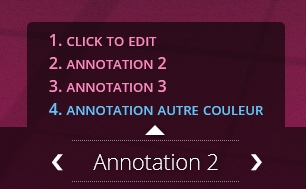
This menu allows you to navigate among the annotations present on the model. The model will automatically choose the shortest rotation to display the desired annotation. Arrows display the next/previous annotation relative to the user's current annotation. A click on the title in the center opens a contextual menu displaying the list of available annotations.
The annotation view (model orientation, zoom level) displayed will always be the one the editor was in when he created the annotation.